You can add an event by clicking the New Event button in the
toolbar, or the plus (+) sign next to any day in the calendar.
You'll see lots of options in the Event Edit window; here's a
step-by-step guide:
General tab
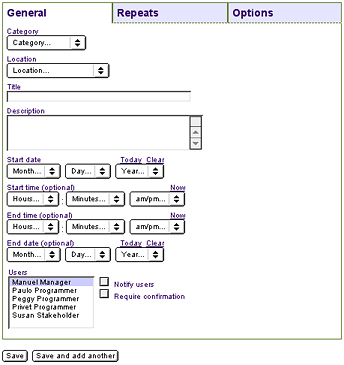
(click to enlarge)
Category
Each event requires a category setting to help organize
it on the calendar views. Categories can be public or private,
and any user can create new categories as needed.
Location
If the event is a meeting that takes place at a regular
location like a conference room, you can specify the location
here. You can edit the list of locations by clicking Admin
in the toolbar and then Workflow at the top of the page.
Title
The title is a short summary of the event that will appear
on calendar views. You can omit any identifying words that
would be evident from the category setting. For example,
if the event is in a category called "Acme Project," you
could name an event "kickoff meeting" rather than "Acme kickoff
meeting."
Description
The description can include details about an event that
don't fit into the title. For example, you could list meeting
agenda items, a unique location that isn't included in the
Location list, or instructions for a project task. Other
users can read the description by clicking an event on any
calendar view, or by simply rolling over the event title.
Start date
The only timing information that you must enter for an event
is the date on which it starts. If you opened a new event
window by clicking a plus (+) sign on the calendar, Chronolog
will set the start date to the date that you clicked.
Start time
For events that start at a particular time on the start
date, you can also enter a start time.
End time
For events that end at a particular time on the start
date, you can also enter a start time.
End date
For events that last more than one day, you can also enter
an end date.
Users
Select all the users who will participate in this event.
You can Control-click to select multiple users. If you don't
select any users, the event will apply to all users.
Notify users
If you select this option, every user you selected will
receive an email notification of the event as soon as you
save it. Unless you know that users aren't viewing their
calendars regularly, you can usually skip this option
to avoid email overload.
Notify [username]
If you edit an event that someone else created, this option
will appear. If you select it, that user will receive an
email notification that you have modified the event. This
can avoid confusion if the original user doesn't know you
are modifying the event.
Require confirmation
If you select this option, Chronolog will send an email
confirmation to every user you selected, and the event won't
appear on a user's calendar unless he or she accepts the
confirmation. This allows users to "opt out" of events that
you invite them to.
Repeats tab
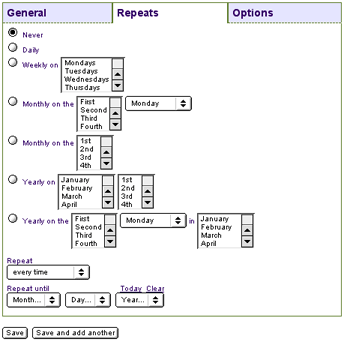
(click to enlarge)
Daily / Monthly / Yearly
If you'd like an event to appear on the schedule regularly,
you can use the various repeat options to describe when it
should appear. For example, you could set up a staff meeting
to repeat on the first Monday of every month, or a birthday
to repeat on a specific date every year.
Repeat
This option, combined with the previous options, allows
you to create an event that repeats on a regular interval, such
as every two weeks or every three months.
Repeat until
You can enter the last date on which a repeated event should
appear, if you want the repeats to stop at a certain point.
Options tab
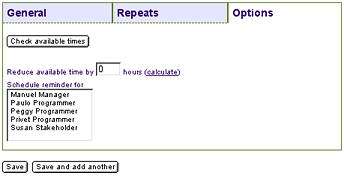
(click to enlarge)
Check available times
Before setting a time for an event, you can check the schedules
of the users involved to see what times they have
available. If you click this button, Chronolog will open
a new window displaying a list of available times, and if
you select your preferred time, Chronolog will enter the
time into the event window for you. This is most useful for
events that should take place at a specific time; for events
that can take place across a range of time, the Capacity
of Individual Users report is generally a better planning
tool
Reduce available time by
The time that you enter here will appear on the capacity
reports of the users that are involved with the event. For events
with a specific start and end time, you can click the Calculate
button to automatically enter the event duration. For events
that can take place across a range of time, you can enter
the actual time you expect the event to take. For example,
you might allow a 4-hour project task to take place any time
during a three-day period, but you would enter 4 in this
field.
Schedule reminder for
If you select this option, Chronolog will remind each of
the users you selected about the event before it takes place.
The exact timing and format of the reminder depends on each
user's personal preferences, which users can set by clicking
the Preferences button in the toolbar.


)
)
)